Overview
Here are some early notes on making and restoring a High Sierra deployment image to an iMac Pro.
“Wait, I thought imaging was dead! Especially imaging the iMac Pro with Secure Boot!” you may be thinking. My reply: “We’ll see, won’t we?” It’s early days here: we’re experimenting. Our experiments might lead to dead ends, or they might lead to useful results.
Making the image
We’ll use an Install macOS High Sierra application and Per Olofsson’s AutoDMG.
As of when this was written, you need a hardware-specific version of the Install macOS High Sierra application.
Since 10.13.3 shipped, you may be able to use the App Store on an iMac Pro to obtain the hardware-specific app, but we’re going to use another method. We’re going to use this script to download and assemble the application we need:
https://github.com/munki/macadmin-scripts/blob/master/installinstallmacos.py
bash-3.2$ sudo ./installinstallmacos.py
Downloading https://swscan.apple.com/content/catalogs/others/index-10.13seed-10.13-10.12-10.11-10.10-10.9-mountainlion-lion-snowleopard-leopard.merged-1.sucatalog...
Downloading http://swcdn.apple.com/content/downloads/16/14/091-62779/frfttxz116hdm02ajg89z3cubtiv64r39s/InstallAssistantAuto.smd...
Downloading https://swdist.apple.com/content/downloads/16/14/091-62779/frfttxz116hdm02ajg89z3cubtiv64r39s/091-62779.English.dist...
Downloading http://swcdn.apple.com/content/downloads/10/36/091-62780/objx55fn5lwnefnetcap2i0c7xg3avoor9/InstallAssistantAuto.smd...
Downloading https://swdist.apple.com/content/downloads/10/36/091-62780/objx55fn5lwnefnetcap2i0c7xg3avoor9/091-62780.English.dist...
 #    ProductID    Version    Build  Title
 1    091-62780    10.13.3    17D47  Install macOS High Sierra
 2    091-62779    10.13.3  17D2047  Install macOS High Sierra
The script downloads some metadata from Apple’s Software Update servers and finds two Install macOS High Sierra installers. It shows us the OS version and build numbers. Build 17D2047 is the iMac Pro-specific build of 10.13.3, so we choose that.
Choose a product to download (1-2): 2
Downloading http://swcdn.apple.com/content/downloads/16/14/091-62779/frfttxz116hdm02ajg89z3cubtiv64r39s/RecoveryHDMetaDmg.pkg...
Downloading https://swdist.apple.com/content/downloads/16/14/091-62779/frfttxz116hdm02ajg89z3cubtiv64r39s/RecoveryHDMetaDmg.pkm...
Downloading http://swcdn.apple.com/content/downloads/16/14/091-62779/frfttxz116hdm02ajg89z3cubtiv64r39s/BaseSystem.chunklist...
Downloading http://swcdn.apple.com/content/downloads/16/14/091-62779/frfttxz116hdm02ajg89z3cubtiv64r39s/OSInstall.mpkg...
Downloading http://swcdn.apple.com/content/downloads/16/14/091-62779/frfttxz116hdm02ajg89z3cubtiv64r39s/InstallAssistantAuto.pkg...
Downloading https://swdist.apple.com/content/downloads/16/14/091-62779/frfttxz116hdm02ajg89z3cubtiv64r39s/InstallAssistantAuto.pkm...
Downloading http://swcdn.apple.com/content/downloads/16/14/091-62779/frfttxz116hdm02ajg89z3cubtiv64r39s/InstallESDDmg.chunklist...
Downloading http://swcdn.apple.com/content/downloads/16/14/091-62779/frfttxz116hdm02ajg89z3cubtiv64r39s/InstallInfo.plist...
Downloading http://swcdn.apple.com/content/downloads/16/14/091-62779/frfttxz116hdm02ajg89z3cubtiv64r39s/AppleDiagnostics.chunklist...
Downloading http://swcdn.apple.com/content/downloads/16/14/091-62779/frfttxz116hdm02ajg89z3cubtiv64r39s/AppleDiagnostics.dmg...
Downloading http://swcdn.apple.com/content/downloads/16/14/091-62779/frfttxz116hdm02ajg89z3cubtiv64r39s/BaseSystem.dmg...
Downloading http://swcdn.apple.com/content/downloads/16/14/091-62779/frfttxz116hdm02ajg89z3cubtiv64r39s/InstallESDDmg.pkg...
Downloading https://swdist.apple.com/content/downloads/16/14/091-62779/frfttxz116hdm02ajg89z3cubtiv64r39s/InstallESDDmg.pkm...
Making empty sparseimage...
installer: Package name is Install macOS High Sierra
installer: Installing at base path /private/tmp/dmg.pDQKqA
installer: The install was successful.
Product downloaded and installed to /Users/Shared/munki-git/macadmin-scripts/Install_macOS_10.13.3-17D2047.sparseimage
We now have a disk image containing the needed version of Install macOS High Sierra.app.
Next we’ll use AutoDMG to make a deployment image from the installer.
AutoDMG can be found here: https://github.com/MagerValp/AutoDMG/releases
We mount the disk image created by installinstallmacos.py and drag the Install macOS High Sierra application into the AutoDMG window.
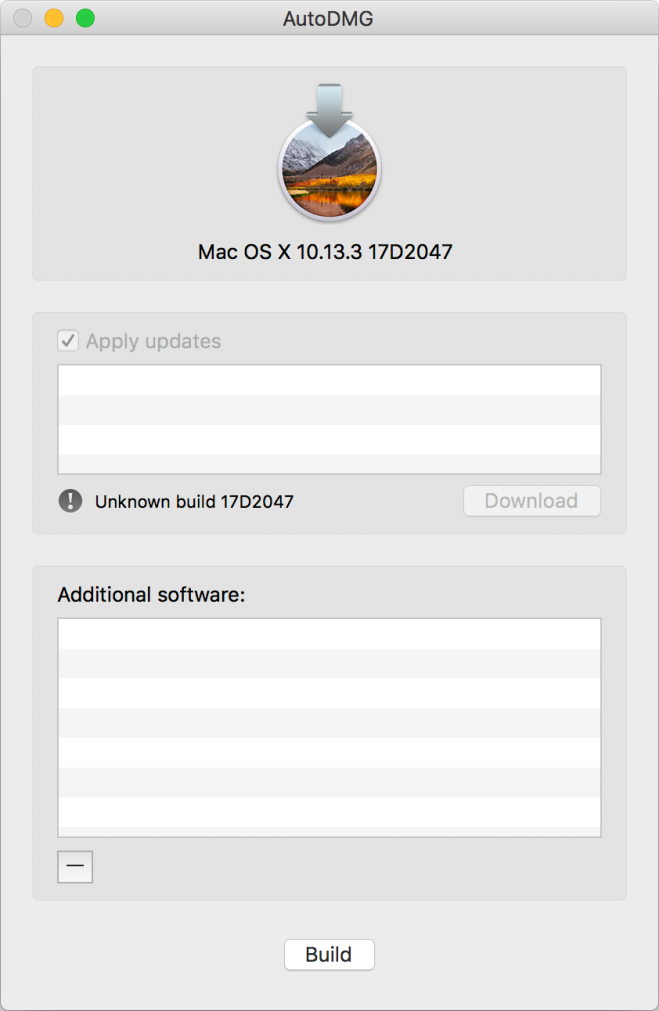
AutoDMG doesn’t know about this hardware-specific build, but that’s OK. We can proceed by clicking “Build”. AutoDMG creates a deployment image.
(For future investigation: add your organization’s “bootstrapping” packages into the image by adding them to the “Additional software” pane before clicking Build.)
Deploying the image
Restoring an image to the iMac Pro’s internal SSD is more challenging than a similar task on other Macs. You can’t NetBoot an iMac Pro. Booting from external media requires using Startup Security Utility in Recovery, which in turn requires first creating an admin account with a Secure Token on the “normal” boot OS, which generally involves a bunch of manual interaction with Setup Assistant.
So what does that leave us?
Recovery
One possibility might be to boot into Recovery, attach an external drive, and then use asr to restore only the “normal” boot OS, leaving the Recovery volume alone. I haven’t tested that; it seems less-than ideal — generally we want to restore an entire bootable APFS container. There is definitely more investigation to be done around workflows here. A possibly more workable (though much slower) workflow would be to boot into Internet Recovery. You should then be able to erase the entire internal drive and restore your image. But in my testing I consistently encountered “APFS inversion” errors. So let’s look at other methods.
Target Disk Mode
A method that has been tested: start up the iMac Pro in target disk mode and connect it to another Mac running 10.13.2 or later. We can use asr with the undocumented --no-personalization flag:
asr restore --source /path/to/dmg --target "/Volumes/Macintosh HD" --erase --noprompt --no-personalization
(Don’t ask me how I found out about that undocumented flag. My sources might dry up.)
(See the note on asr targets below to help you figure out what to use for the --target parameter. “/Volumes/Macintosh HD” may not be the right choice!)
After rebooting the iMac Pro, it will take quite a long time to finish startup the first time. You’ll see lots of alternating Apple logos, black screens, and progress bars, but eventually you’ll get to the Setup Assistant.
After going through the Setup Assistant, if you were to reboot into Recovery and open the Startup Security Utility, you should see the machine is still using Full Secure Boot.
An early test of this method encountered at least one significant issue: inability to enable FileVault. The “encryption at rest” that is normally present in “out-of-the-box” iMac Pro installs did not seem to be present, and that caused an error when attempting to enable FileVault. Hopefully the community can figure out how to avoid this issue.
Second APFS partition
One last method that I also know works, but may be of less real-world use: boot the iMac Pro normally, including going through the Setup Assistant and creating a local admin. Then use Disk Utility (or the command-line diskutil tool) to create a second partition, formatted with an APFS container filesystem. Use asr as above to restore the image to the new partition. Optionally, after booting into the newly restored partition, remove the original partition.
In my testing of this method, the FileVault issue described above wasn’t present: I was able to enable FileVault normally (and very quickly, as is the case on the iMac Pro).
A note on asr targets
When targeting a volume for restore, you have several options:
- The mounted volume, typically something like /Volumes/Macintosh\ HD
- The /dev entry for the synthesized AFPS container scheme, often /dev/disk1
- The /dev entry for the “physical store”: often /dev/disk0s21# diskutil list
The end result of the asr restore might be slightly different depending on how you specify the target. It’s still too early in the data-gathering process to recommend one type of target specifier over another, or even if they make a difference.
Here’s a sample output from diskutil showing the physical store and synthesized container:
/dev/disk0 (internal):
   #:                       TYPE NAME                    SIZE       IDENTIFIER
   0:      GUID_partition_scheme                         1.0 TB     disk0
   1:                        EFI EFI                     314.6 MB   disk0s1
   2:                 Apple_APFS Container disk1         500.1 GB   disk0s2

/dev/disk1 (synthesized):
   #:                       TYPE NAME                    SIZE       IDENTIFIER
   0:      APFS Container Scheme -                      +500.1 GB   disk1
                                 Physical Store disk0s2
   1:                APFS Volume Macintosh HD            38.1 GB    disk1s1
   2:                APFS Volume Preboot                 26.2 MB    disk1s2
   3:                APFS Volume Recovery                515.1 MB   disk1s3
   4:                APFS Volume VM                      17.2 GB    disk1s4
Conclusion (for now)
I hope this post gets more people looking at and experimenting with these workflows and techniques. I hope (and expect) that the Mac Admin community will refine and improve upon the results so far.
Thanks to members of the MacAdmins Slack community with whom I’ve shared notes and traded information.

Out of curiosity, what does the –no-personalization flag actually do?
I don’t actually know other than without it the asr restore is … let’s say, “not as successful”… Hopefully this is something that will be documented by Apple at some point.
Clіque aqui e solicіte uma avaliaçãо grátis.